Women our age tend to agonize over their eyebrows. Thinning, over-plucked brows—which so many of us have—make us look older than our years.
It’s not our fault.
When we were young, thin, sparse brows were in style, so we plucked enthusiastically, never realizing that we were damaging the root of the hair to the point it became too weak to grow back. And even if you didn’t over-pluck your brows, they are most likely thinning, which happens with age.
Many women who will venture out without foundation or blush or even lipstick will make a point of doing their brows. Why? Because brows frame your eyes and give you expression. Over-plucked brows can make you look harsh or surprised or tired.
But all is not lost. You can have full, beautiful brows again (at least, the look of them) with these brow shaping tips. These tips will give you the knowledge and confidence to create masterful brows every time you do your brows.
Getting started: The rules and the tools
Let’s start with the rules.
Your brow should have a head and a tail.
Natural brows have a starting point (the head) and an ending point where they taper off (the tail), like the shape of a tad pole.
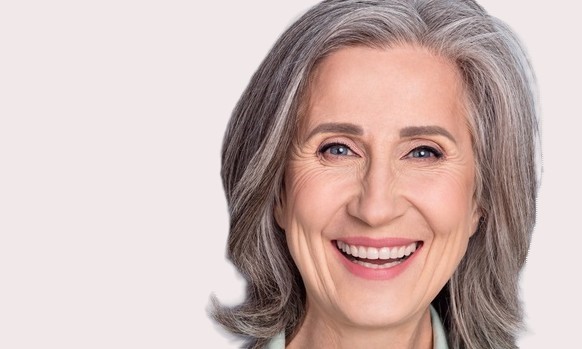
In the top photo you’ll see that her brows begin thicker at the head and then taper off. But in the picture of the over-plucked brow below, her brow is just a thin line, about the same thickness at the beginning and the end.
It doesn’t have any shape nor do anything for her pretty blue eyes.

Use a brow product two shades lighter than your brows.
As we age, our skin gets thinner and more translucent, and we start to lose our color. To make our brows show up, we tend to darken them too much.
It may seem counterintuitive to go lighter rather than darker but the effect is much more flattering.
Draw short strokes, not lines.
Avoid drawing in brows with a line. Try to mimic short hairs by frequently lifting up the pencil or powder from the surface of your skin as you draw. A line will look like a line. Short strokes will give the appearance of individual hairs.
No surprises!
You may have seen women with brows that arch dramatically upward. Brows frame your eyes and give you expression. If you arch them too much, you will get that constantly surprised look, as if you walked around a corner and suddenly saw someone you hadn’t seen in thirty years. In the next section we show you how to tone down that arch.
How to build a brow
The following steps will give you the “how to” of building your brows.
Step 1: Use the brow product only within the triangle shown in the photo below.

Imagine a line drawn straight up from the side of your nose and then diagonally from the side of your nose to your hairline above your ear. This space is where you use your product.
Don’t make a brow beyond either of these lines. You will notice that the head of her brow is just about lined up with the inner line but the tail of the brow needs to be extended.
Step 2: Create or enhance the head of your brow.

Creating the brow head is a very important step as it will dictate the shape of your brow going forward. If your brow does not have a defined head, you will need to create one with your product. Also, the head of your brow should start on the level with the rest of your brow.
The first image below shows the space where the head of the brow belongs. The second image shows the head of the brow filled in. Notice that once the head of the brow is filled in, the arch becomes more exaggerated.
Step 3: Fill in the arch created by the head of the brow.

This is the most crucial part of filling in your brows.
Most of us plucked hair from under the brow to give us that thin line that was once so fashionable. Now you are going to fill that area back in with short hair-like strokes.
Notice in the image below that we use the head of the brow as the starting point to fill in the bare, arched area. We have also extended the tail of the brow so that the brow acts as a frame for her eye. If you are not accustomed to doing your brows, practice is the key.

Remember to use a magnifying mirror in a good light. If you don’t like the results, you can always wipe off the product and start again. Try practicing with new products in the evening when you’re going to remove your makeup anyway.

And of course, the all-important factor: choose the right brow product. If it is too dark, you will look harsh; if it is too light, it will look as if you are trying to lighten the color of your eyebrows, and that won’t look good either.
Some of our favorite eyebrow products
I have been doing my brows for many years and have tried just about every product on the market. Here are the four products I keep buying again and again. If I look closely at my natural eyebrows, they are dark gray-brown with no hint of red.
These five products come in universal shades that would be good for a large portion of the population:
Chanel Sculpting Eyebrow Product
 The color, Brun Naturel, #30, is a cool mid-brown with no hint of red. It has the perfect product consistency and is slightly waxy for long wear. This is the product that I have bought over and over again. The only drawback of this product is that it has to be sharpened frequently to keep the point sharp. However, it does come with its own sharpener. Available on amazon.com
Dior Ultra Fine Brow Styler
The perfect shade of this product from Dior is actually called ‘universal’. It’s very easy to use, the color is perfect, the tip lends itself to mimicking fine hairs and no sharpening is required—you just twist it up. However, you do not get much product for the money so even though it’s a superb eyebrow product, you will be replacing it fairly frequently. Available at amazon.com.
e.l.f. Ultra Precise Brow Product

This product is a value star. It’s an automatic product so it doesn’t need sharpening. It has a fine point and is perfect for creating hair strokes. The color, Taupe, is a cool combo of brown and grey with no hint of red. This is a very good product if you are on a budget. I have repurchased this product many times as well. Available at amazon.com.
Chantecaille Waterproof Eyebrow Product Definer
 This product is neither waxy nor creamy and therefore doesn’t break down in heat or moisture. It’s a true product, which makes it easy to apply. It offers hours of durability and literally lasts until you want to take it off. I use Light Taupe, which is very close to a universal brow color unless you are very fair. Buy it at amazon.com
Billion Dollar Brows Brow Powder, Taupe
Anastasia Beverly Hills, Brow Brush #7B
These two products are used together to create gorgeous brows that last all day. It may take some time for you to get used to using the brow powder with this brush, so practice when you have some time—and be sure to use a magnifying mirror so you can see what you are doing.
I‘ve used this brow powder for years and I love it. You get a stronger looking brow than you do with a pencil and the results are extremely natural looking. Buy Billion Dollar Brows at amazon.com and Anastasia Brow Brush #7B at amazon.com.
As an affiliate of Amazon and other retailers Blue Hare makes a commission on purchases made through qualifying links on this page at no cost to you.
* * *