Good bone structure is associated with youth and beauty. Most beautiful people tend to have an appealing facial structure—either naturally or with the help of a good makeup artist. As we age, however, our skin loses collagen and begins to sag. When this happens, we lose that toned look that adds interest, character, and youthfulness to our faces.
To understand how this works, just envision a famous painting.

Now try to imagine that same painting without its depth—in other words, as if the artist had painted a flat image without the shadows and light that create perspective. Simply put, light accentuates and brings a feature forward while dark diminishes or causes a feature to recede. This same principle applies when highlighting facial structure with contouring. Mastering this skill can take years off your appearance.
What is contouring?
Contouring is a makeup technique that uses light and dark creams or powders to accentuate bone structure. It can apply to a full face or focus on contouring specific features. For instance, someone with a wide nose can make it appear slimmer while another can make a sagging jaw line appear firmer. Contouring is a great way to appear your best in photographs and at special events.
Do it wrong, look like a clown.
If not done carefully, contouring can make a face look clownish and dirty. Using the right shades is essential, particularly for the darker contouring makeup. Stay away from shades that are too ashy, dark brown, or orange. As for highlighters, avoid the sparkles and glittery ones that can make a face look overly made up. Enlist the help of a makeup professional (whose makeup you consider flattering) at your trusted makeup counter to select the shades best suited for your skin tones. They have the training and experience to suggest the right highlight and contour colors. Contouring is very much in vogue now so every makeup line has its own contouring kits, products, and brushes to help you achieve the right look.
Less is more when contouring at our age
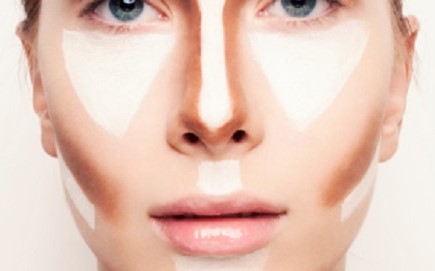
Another caution is to avoid undertaking full face contouring. This involves using shades to slim the nose and jaw line and highlighting the cheeks and forehead. However, most of us don’t have the time or the inclination to do whole face contouring every day.
Remember, less is more, and although this adage applies to all makeup, it is particularly true of contouring. A light hand applying the right product in the right way can make you look wonderful.
If you want to try contouring, the easiest place to contour with the most flattering results is the cheekbone area.
High, pronounced cheek bones lift the face and draw attention to the eyes. It’s possible to mimic the look of cheekbones with some well-placed, subtle makeup.
By creating peaks and valleys with makeup, your cheekbones can appear far more pronounced than they actually are. And the beauty of cheekbone contouring is that you can do it every day in minutes as part of your makeup routine.
And, you won’t look overdone in daylight and the results are truly flattering. Don’t worry about the shape of your face because you can naturally accentuate, enhance, and bring out the natural beauty of your cheekbones.
Say “high” to your cheekbones
To begin, assemble your tools. You will need:
A good mirror.
You will need a two-sided mirror with both regular and magnifying views.
Contour color
Contour color comes in cream or powder. The problem with powder is that it does not travel easily over mature skin—it tends to gather in pockets.
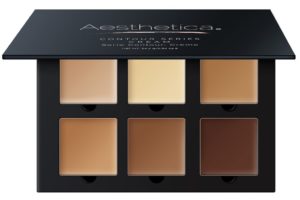
Cream contour blends more easily over dry, aging skin and wears longer. Just about all of the cosmetic lines have contouring kits so consult with a sales assistant to get the right color for your skin tone. There is a very good cream contouring kit from Aesthetica (see left), available on Amazon. If you order online, be sure to read the reviews.
A brush or a highlighter stick for the top of your cheekbones
Some people prefer a brush to apply the highlighter and some prefer a stick highlighter that they apply directly to the face. Experiment to see which method you prefer.
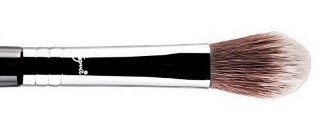
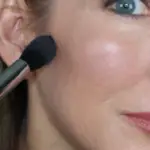
If you choose a brush, it should be a rounded, fairly full one. The Sigma Cheekbone highlighter, available from Amazon, is an ideal brush for highlighting and rates a 5 out of 5 from 18 reviewers. The Sigma highlighter brush is pictured at left.
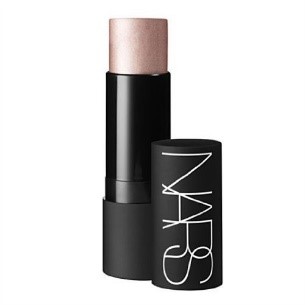
If you prefer a stick, select a product that isn’t overly frosted or has glitter as this look isn’t flattering on older skin and will make it look as though you are trying too hard. You are looking for shimmer to reflect light, not glitter. There is a big difference. NARS has a beautiful highlighter stick available on Amazon or from major department stores. At right is NARS Le Multiple in Copacabana
A brush or a dark cream stick for under your cheekbones
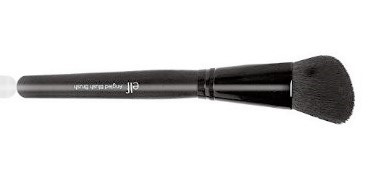
If you choose a brush, it should be an angled one. It will be easier to get into the hollows of your cheeks with an angled brush. The E.L.F. angled brush is a super buy from Amazon and rates 4 out of 5 from 268 reviewers.
If you prefer a stick for the dark color, make sure it flatters your skin tone and does not look “muddy”.
Ordering online is trickier with the darker color because you want to be sure you are getting the right shade. That’s the beauty of the Aesthetica palette (above): it contains a variety of darker shades so you can experiment to find the right one.
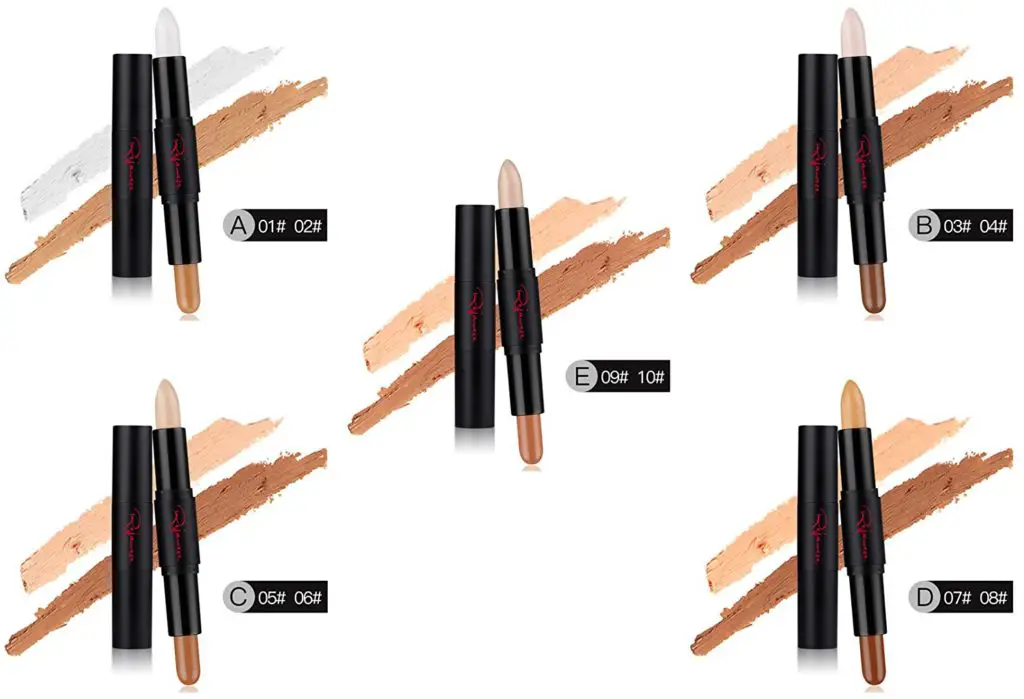
And then there’s this little gem: the Cosmetics Cream Contour and Highlighting Makeup Kit by Rejawece. It contains ten sticks that have both a highlighting and a shadow end so you can choose the best color for your skin tone of each.
You have the tools. Now here’s the technique.
- Pin your hair back away from your face. Sit in front of your mirror in good light but not direct sunlight.
- Pick up some of the dark color contour with your angled brush or use the dark stick. (Don’t worry about the amount for now. You will quickly get used to how much you need.)
- Hold your hand flat at right angles to your face and lay the baby finger side against your cheek. Angle your hand just under your cheek bones. (The finger end of your hand should be at your ears and the wrist part of your hand should be at your mouth.) Press your hand against your skin along this trajectory. The mark left by your hand on your skin is where you are going to put the dark color of your cream contour.
- Sweep the dark color along the press mark left by your hand. The greatest amount of product should be up near your ears and the least amount of product should be near your mouth. Don’t take the product past the middle of your eye. If you take the product to your nose, it will look like a dirty smudge. Picture a straight line drawn down from the center of your eye that stops at your nostrils. Blend the dark color until there is a shadow but not a pronounced line.
- Take the round brush and pick up some of the highlighter
- Sweep the light color directly above the darker line or sweep your highlighter stick on the same trajectory above the dark line. Now step back and look at yourself in the normal side of your magnifying mirror. Your cheek bones should look pronounced and make your face look younger and slimmer.
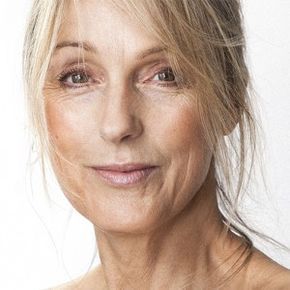
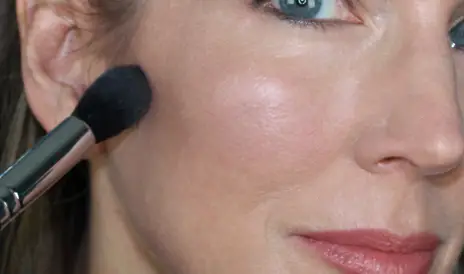
You can see how subtle contouring accentuates this woman’s cheekbones.
If all you see is a dirty look when you try contouring, keep practicing. You probably used too much of the darker color, which is a common mistake. You will not be expert at contouring at first but with practice you will master this trick that makes you look more vibrant and polished.
* * *
If you are curious about full face contouring, perhaps for a special event or for photographs, there is a tutorial at hotandflashy50.com that gives step-by-step instructions on tools and techniques.
Header image from runningwithmascara.com
Read More BLUE HARE: HOME